Showing posts with label rhinestone. Show all posts

Tuesday, June 12, 2012

so far behind..

Okay it's been almost a year since I've posted so I'll drop all of the photos of nails I've done in the next post or so. I'll just have to see how this goes :D

April 3, 2011: Coral Crackle


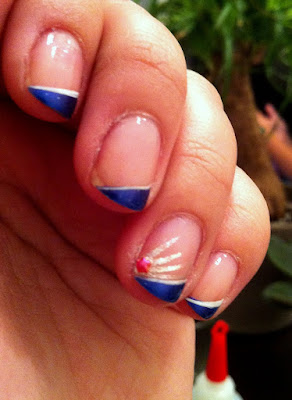
July 3, 2011: Patriotic Mani

August 3, 2011: Red Tigers


October 3, 2011: Graphite and Gold


October 11, 2011: Carnival Accent


December 15, 2011: Another set Disneyland nails


Wednesday, May 4, 2011

backlog: Mar 2009

I should do another set like these :D Although I've rarely every repeated a set, if ever...


polish:
+ OPI - I Only Drink Champagne
+ OPI - Bride's Bouquet

extras:
+ striper: Kiss - Black
+ pink rhinestones

Wednesday, January 19, 2011

Nino helped with this one

My boyfriend often laughs at/with me (but it's mostly at me) b/c I love to do my nails. He says "It's just cute that you are so dedicated to doing your nails." In truth, I love doing my nails but my life doesn't revolve around doing them (is that some sort of nail blog blasphemy or what?). So even thought I do them as often as I can, sometimes I just get lazy or feel uninspired. So lately, my nails have been half-assed b/c I don't feel like getting complicated.

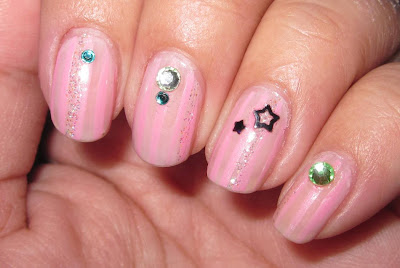
Here's a set I did while Nino was on vacation and visiting me. I asked him what color: he said "pink". I asked him what kind of design: he said "stripes. Then I said the set looked boring, so I added glitter (my own decision!) then I asked how it looked: he said "needs something... more." I let him choose the gems! and I knew I wanted stars. And in the end, the result is what you see below.


The base pink and stripe design I've used before: Disneyland Is Cute

polish:
+ OPI's Tutti Frutti Tonga
+ light pink striper by Art Club
+ irridescent glitter striper by Art Club
extras:
+ Art Club nail art sprinkles in black stars
+ Swarovski flatback rhinestones (7ss Jonquil, 5ss Crysolite, 5ss Blue Zircon)

the best neutral shade ever

How I met the best neutral shade ever.
by Chellie

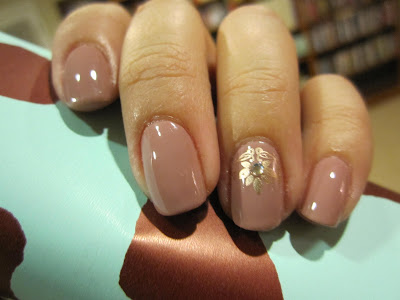
I was browsing Amazon for some konad plates that might be on the cheap (okay almost!) and I found some misc sellers that were selling OPI polishes for $3! of course it's too good to be true b/c each item's shipping cost was $3. But c'mon $6 for OPI polish! So I had to do some research while I browsed through the seller's shop b/c it's hard to tell with some photos, right? The color might be misrepresented or completely the wrong shade. But I came across Tickle My France-y and, as usual, I was sold on the name! A few blogs had done some nice polish reviews on it so I decided to take a chance.

And now I have it.. and I LOVE it! soft and pretty. *sigh*


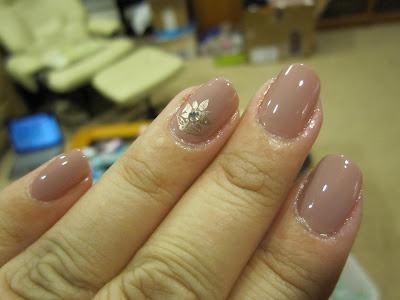
polish: OPI Tickle My France-y (Le Collection de France)
fauxnad plate: bm08 (bundle monster plates on amazon) (review of bundle monster's plates from theshadesofu.com
konad polish: China Glaze 2030 (Khrome Collection)
extras: 5ss AB Crystal Swarovski flatback rhinestone

Wednesday, June 9, 2010

pink holo


color: China Glaze Rated Holographic
Gems: pearl and crystal rhinestones

Friday, October 9, 2009

pink quarters

okay so I'm backlogged even in my most recent nails.. But I'm sure no one will notice... (¬.¬)
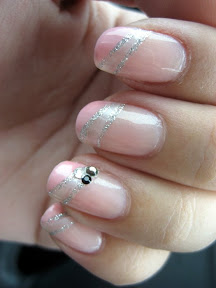
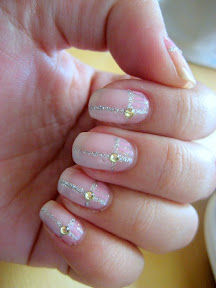
Another pink one! yes.. can't get enough of that pink I have (OPI's I'll Take The Cake). I was feeling softy and pinky again so this is what I came up with.

duration: 25 mins (was probably watching Psych again)

notes:
▪ I don't think I kept these on that long but they would have lasted a while.
▪ I used a larger gem this time because there was only 1 and it was almost in the middle of my nail.
▪ I designed these with quadrants in mind so here's a link to an image with numbered quadrants for reference.

colors/steps:
▪ 1 coat Orly Bonder
▪ 2 coats OPI I'll Take The Cake
▪ 1 coat of a pearly white (a Winmax I picked up from Daiso)in 1 imaginary quadtrant of my nail. You have to kind of imagine where the lines will go to do this but I think if you don't stray too far out of the imaginary lines, you'll be fine. The glitter striper is forgiving :)
▪ drew 1 line of Kiss silver glitter striper vertically and 1 line horizontally across my nail following where I imagined I wanted to put my quadrants. You'll notice I have the crosspoint off center. so the vertical line is about 1/3 of the way into my nail instead of right in the middle. Just for variety :P And the horizontal line is placed slightly closer to my cuticle rather than right in the middle again.
▪ for kicks, I drew pink vertical pinstripes with Art Club's pastel pink striper in the quadrant (quadrant 4) opposite the pearly white quadrant (quadrant 2)
▪ in between the pink vertical stripes, I used Art Club's iridescent glitter striper to give it some sparkle.
▪ the final touch: 1 7ss Jonquil Swarovski Chrystal at the intersection of the silver glitter stripes adhered with Orly Bonder.
▪ 1 coat Seche Vite

Thursday, September 24, 2009

sweet sparkly pink

I liked my new soft pink polish (OPI's I'll Take The Cake) so much that I decided to do another nail set in this color theme. :) pink pink pink! Think Pink! (Has anyone seen Funny Face? There's a cute song about the color Pink in there). This one was really simple.
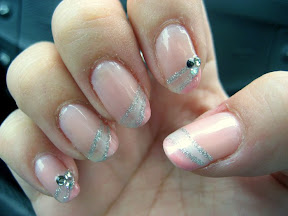
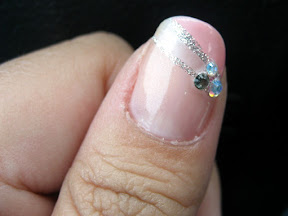
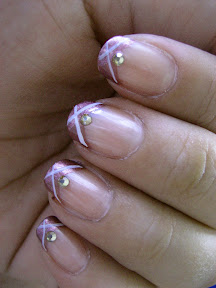
But you have no idea how much time it took me to figure out what I wanted to do. I knew I wanted to use a new nail polish but I after I'd put OPI's My Private Jet on 1 hand and tried a french tip in China Glaze's Cords... I decided my nails were too long for such a dark color. So I took that off. Then I repainted them in China Glaze's It's My Turn. And again, I wasn't feeling the color at all. So I took that off. I kept eyeing my pinks so I decided.. PINK IT IS!


duration: 30 mins (not including the 2 other sets I painted before this one while watching Psych)

notes:
▪ simple is best :D
▪ this was the result at the 3rd attempt at painting my nails last night. lol
▪ this is one of those times I was glad to have a variety of rhinestone colors. But I wish I had more variety in sizes. (my standard is 5ss)

colors/steps:
▪ 1 coat Orly Bonder
▪ 2 coats OPI I'll Take The Cake
▪ 1 coat of pearly white polish (~70% opaque) from Daiso (brand: Winmax) in a line going diagonally across my nail (starting almost halfway down and going upwards towards the other side at ~ a 30 degree angle)
▪ 1 coat of Nailite Inc's Peach Schnapps (mixed with white and other pinks to make it more pinkish and less peachy(starting ~2mm higher than the pearly white layer and going upwards at ~ a 50 degree angle towards the other side)
▪ use Kiss Silver glitter striper to make lines where the 2 colors meet.
▪ 1 dab of Orly Bonder where I want to put the gems (in this case at the base of the white section.
▪ selected 3 gems in the same color range, 1 larger one and 2 smaller ones to place on the dab of Bonder. I used (in various groupings): 7ss Black Diamond, 5ss Crystal Moonlight, 7ss Crystal AB, 5ss Crystal AB, 5ss
Jet
.
▪ 2 coats Seche Vite

Sunday, September 20, 2009

straight-line french

[ backlog 12.25.08 ]

Another backlog one~ 2 in one night! Gooooo me :D

Really simple design but I like simple. Good for work and good for going out. Best of both worlds, right? I'm not normally a big fan of this type of polish color on my fingers because it makes me think my skin looks sickly pale or something. I'm sure it's all in my mind ^_- I'd done this style before but I just wanted a chance to play with a new nail color :D It's one I picked up at an H&M in Lisbon (I was on an 11 day cruise on RCCL's Independence of the Seas to parts of Europe and the Canary Islands! It was a fantastic trip. Plus I met my honey while on this one ^_-). The color is H&M's Velvet Touch. The price was something like 2 euros so I figured why not, right? ^_^

duration: 30 mins + a few minutes to pick the colors to use

notes:
▪ So simple, I'd say anyone can do this one.
▪ The gems didn't last long for me for this set b/c again, I didn't put a top coat! Get off my case, people... :P I just didn't know better, at the time! ^_-
▪ If I want my french manicures to look really clean I use sheer & pale colors so that my real nail color doesn't distract from whatever shade I'm using on the tips. (e.g. Orly's Sheer Nude)

colors/steps:
▪ 1 coat Orly Bonder
▪ 1 coat of something sheer by Orly. The label fell off already. >.< but it might actually have been Orly's Sheer Nude.
▪ 1 coat diagonally on the tips from one side to slightly past center of my nail OPI's Sephora polish in "And Then He Said..."
▪ 1 coat diagonally on the tips from the other side to slightly past center of my nail which overlays the other diagonal side in H&M's Velvet Touch
▪ criss-cross Kiss's white striper following the angle of the diagonal layers just painted
▪ 1 dab of Orly Bonder just below where the 2 tip colors meet
▪ 1 7ss Golden Shadow Swarovski rhinestone where you put a dab of Bonder.

Wednesday, September 16, 2009

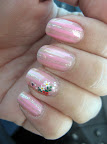
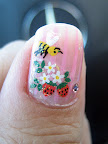
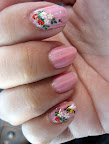
striped & strawberry-d

I really wanted to use my strawberry nail seals so I finally thought of a way (in my head) that would be pretty cute and creative-ish. I just wasn't sure how it'd turn out... and believe me, I've had those days when I was coming up with designs in my head that I just couldn't get done on my nails. they'd always turn up not quite like I imagined.. but I really like this set. (click on photos to enlarge)


duration: 45 mins (2 episodes of Nadesico)

notes:
▪ Love this one. I was thinking I'd do the stripes in white but I thought it might be too much contrast.. grey pin stripes would be nice too, I think :D
▪ Parts of the nail seal curled up a bit after applying a clear coat but I touched that up by applying a teeny bit of Orly Bonder where it was lifting and pressing it down with tweezers while it was tacky. I also used nail clippers to trim the clear bits of nail seal that were flipping up (especially between the strawberries).

colors/steps:
▪ 1 coat Orly Bonder
▪ 3 thin coats OPI I'll Take The Cake
▪ Applied Color Club Pastel Pink striper starting from the middle of the nail and spacing the stripes about 2mm apart until there wasn't room left on my nail.
▪ Apply Pa Nail Collective Nail Seals (strawberries & bees - peta22)
▪ 1 stripe of Art Club crystal glitter striper randomly on each nail between 2 pink stripes.
▪ Set 5ss Light Rose Swarovski Rhinestone on my nail using Orly Bonder as an adhesive.
▪ Fixed lifting corners with Orly Bonder and nail clippers to trim excessive parts.
▪ 2 final coats of Seche Vite

Sunday, September 13, 2009

black lace wedding nails

Since I saw Josh and Maris today (for some decoden fun!) I decided I'm going to be a rebel and post WAY out of order. These are the nails I did for their wedding which I attended on a TUESDAY down in the OC (June 30, 2009). haha~ It was going to be a fun wedding, so I wanted to make fun nails. But of course they'd have to be sophisticated since it was a wedding n all ^_^ I wasn't sure if black would be scary for the wedding.. but I went with it anyway and I thought it actually turned out great. I'm not a fan of ALL black just yet, but I'm okay with the tips ^_^ I like OPI's I Only Drink Champagne b/c it's a really soft but pretty pearly shade of cream. It's one of my more.. neutral and "mature" colors. lol.

duration: 45 mins (15 mins for touch up the night before the wedding)

notes:
▪ I cut the lace in half the long way (which I purchased from Orange Lighthouse). That's just the bottom half with the draped part.
▪ Dark colors are difficult with tips b/c the tips of your nails are the first to chip so it looks really obvious when a black part chips off. -_-
▪ Also, dunno if you'll notice that my index fingers might have some orange-y stains in the detailed pictures.. I went to a crawdad place for dinner the night I arrived in Irvine with friends I stayed with.. as a result, my skin was a tad bit stained. >.<
▪ This set matched the ring my dragi gave me. (*´▽`*)

colors/steps: peta19
▪ Orly Bonder base coat
▪ 2 coats of OPI's I Only Drink Champagne
▪ Orly's Liquid Vinyl for the tips
▪ Measured (roughly), applied, & trimmed PA Collective Nail Stickers in black lace. I trimmed the lace with nail clippers b/c i can get closer to the edge of my nails than with scissors.
▪ Applied a thin layer of Orly Bonder as a tacky glue for the gems following the line of lace.
▪ Set a row of 5ss Crystal AB Swarovski rhinestones on each of my ring fingers after applying Orly Bonder
▪ 1 coat of Orly's Won't Chip (before I had Seche Vite... also a note about Orly's Won't Chip.. it makes lots of bubbles when being applied-esp around anything raised like gems and stickers so I stopped using it).

Hoorah~ 2nd post down.. 30 something more to go. lol. ( ̄□ ̄;)

first nail posting

Inspired by a set seen in Vol. 30 Anniversary ed. of Nail Up Magazine that I picked up from my local Kinokuniya. I'm a big fan of this magazine. They're great at explaining how to do things. Generally, I find that the styles are excessively decorated (as if there's such a thing!) and when I do my version, I tend to tone down the design while attempting to maintain the cuteness of a nail set.
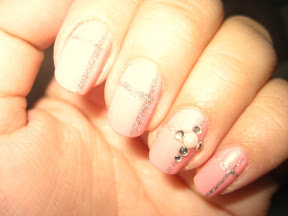
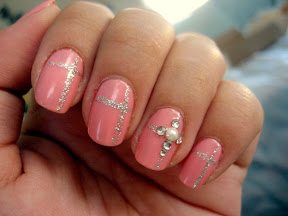
Anyway, the article I found this set in was about "couples nails" - like the girl would have her own girly set, then the guy would have 1 nail done to match. It's actually a cute idea, I think.. but good luck finding a man that's willing to wear sparklies on his nails! (>_<)

Here it is, my first official nail blog nail image post & description to follow:

♥ duration:
30 mins (including drying in between coats)

♥ notes about the look: sweet and elegant. the original design calls for a bright pink 7ss rhinestone in the center of the rhinestone set. I placed a pearl there instead. (because I didn't have a bright pink gem that size)

♥ colors/steps:
▪ Orly Bonder base coat
▪ mixed NailiteInc's Peach Shnapps, OPI's Royal Flush Blush (pearl pink), & OPI's Bride's Bouquet (creme white) all in the Peach Schnapps bottle since it was about 60% full. Applied 2 coats.
▪ Kiss silver striper
10ss Swarovski hot fix pearls and 5ss/6ss crystal rhinestones from VN that my friends brought home for me.
▪ 2 coats of Sally Hansen Diamond Strength in Flawless (it was on sale at Walgreens) to make the glitter striper feel smooth.
▪ 1 final coat of Seche Vite

Hope this is good enough for a first real post (*^▽^*) time to sleep~ nitenite!

edit:
@1:21am omigosh.. haha. I need to leave this thing alone! BUT~ I did get the photo slide show going and added a blog roll :D go mi ^_^~♥