Showing posts with label glitter. Show all posts

Monday, November 19, 2012

Indie Polish: Different Dimension

Yes! Another indie polish maker:) I'm happy to support polish makers... Really happy :) I'd been eyeing Different Dimension for a while and I finally took the plunge when she had a sale. I got Social Suicide, That is SO Fetch, and Soft Kitty, Warm Kitty. Also, I picked up a cuticle balm stick. Great idea to be in a chapstick-like form. Fits great in my purse, so my cuticles will always look moist (even if not totally tidy).


This one is Soft Kitty, Warm Kitty. So cute, right? Plus, plus who doesn't love Big Bang Theory references? BAZINGA! This is 3 coats of SKWK over Color Club Worth the Risque.

Soft kitty,Warm kitty,
Little ball of fur.
Happy kitty,Sleepy kitty,
Purr, purr, purr.


Indie Polish: Glitzology

SUPER BLINGY GLITTER BOMB AWESOMENESS!
I'm so in love with the new polishes I ordered from Glitzology. They're gorgeous! Look at them! I could stare at these all day (*_*)
Full sized bottles I picked up: Blue Lagoon, My Viking Boyfriend (no bars), All or Nothing, and Cotton Candy
Mini sized bottles I picked up: Neapolitan, Diamonds & Pearls, Nebula, As You Wish

The first polish I tried from this set was Cotton Candy which I wore over Seche Rose. It's so cute! The pink is very delicate but sugary and fun like getting cotton candy at a carnival! Even my mom liked it and she doesn't like pink polish nor does she like glitter. And this has plenty of both!


Wednesday, November 14, 2012

Galaxy Nails!

Okay so I'd seen a few tutorials and awesome examples of this technique floating around the web. And I couldn't put it off any longer... I HAD to try it.

Everyone that posted a tutorial said that it was a piece of cake. Easiest thing ever. They weren't too far off the mark on that. I would say that it's easy because it's just randomly sponging a couple of paints onto your nails. But I would also say that consideration for aesthetics comes into play on this. I've seen a couple of examples out there where the galaxy "print" looks too even. That might be my personal preference to see some asymmetry and randomness in a design like this. It's ethereal and just like the cosmos, it's all over the place. I tried to scatter my colors and it sort of worked.

The only other thing I noticed while I was doing this was how unlike a galaxy it looked really until I put the glitter coat on. I didn't want to get my hands messy with the toothbrush splatter technique although it does look awesome like that. So I went with the easy glitter method. But once I put that glitter on, it just BAM! looked like the galaxy. (I think I was channeling Alexis Mateo there...) I even got these odd clumpy polish circles from the sponge dabbing but it worked out fine!

Oh.. another note. I started with a wedge makeup sponge with perfect cut edges. By the end, I'd torn it into smaller pieces (like in Coewless's tutorial) and put the paint on the torn parts to sponge on. Doing that gave a nicer more random sponging pattern.

I REALLY DO love this style. I keep looking at my nails (dangerous while driving) and thinking to myself that it really does look like images of the galaxy on my nails.


Polishes:
  • NYX Girls - Robotic
  • Orly - It's up to Blue
  • China Glaze - Electric Beat
  • China Glaze - Re-Fresh Mint
  • Essie - Castaway
  • Color Club - Worth the Risque
  • China Glaze - Fairy Tale
  • Seche Vite Top Coat
  •  
Tutorials and Posts about Galaxy Nails:

    Friday, November 9, 2012

    Indie Polish: Hit Polish

    Yeah. Hit Polish's glitters don't get old! They're so so so cute and sparkly!
    This is Hit Polish Retro Chic over OPI Tickle My France-y.
    You can pick up her polishes at the Hit Polish Etsy store. She's super easy to work with and shipping was awesomely fast!

     
    App I used: Rakugacute

    Monday, November 5, 2012

    Sunday, November 4, 2012

    Babysitting time = nail polish time!

    Always fun to babysit my nieces.

    Sarah's: Sinful Polish Cinderella over CG Re-fresh mint over CG Lemon Fizz


    My nails: HitPolish Pop Up Video over CG Sea Spray


    Katie's: CG Sea Spray over Re-fresh mint

    Friday, November 2, 2012

    Hit Polish - Shockwave

    There are so many blogs out there that are AWESOMELY FULL of nail polish posts but I hardly update so I'm not that awesome :/

    In any case, here's a quick post on a new polish I picked up this week from an online shop called Hit Polish.  SO SO SO SOOOOOO~ many CUTE and GLITTERY polishes! I went a little berserk and bought 8 minis for myself >.< (that's my guilty face)

    Lookie!
     
    Pretty darn cute! I'm wearing Hit Polish's Shockwave (1 coat) over Ruby Wing Myth (which changes color in UV light to a mauve color).
     

    Tuesday, June 12, 2012

    Black and Gold

    Backlog January 21, 2011

    Erlin pointed this set out to me. It's pretty sophisticated and fun at the same time!

    Original Inspiration from Cupcakes and Cashmere - Touch of Grey


    Sam Sparro - Black and Gold (YouTube) ... Love this song~

    so far behind..

    Okay it's been almost a year since I've posted so I'll drop all of the photos of nails I've done in the next post or so. I'll just have to see how this goes :D

    April 3, 2011: Coral Crackle


    July 3, 2011: Patriotic Mani


    August 3, 2011: Red Tigers


    October 3, 2011: Graphite and Gold


    October 11, 2011: Carnival Accent


    December 15, 2011: Another set Disneyland nails


    Wednesday, May 4, 2011

    feeling spring-y!

    Great weather lately! Pretty mild and sunny. Love it!


    polish:
    + Teal polish: FingerPaints - Art Dealer Teal-er
    + Green polish: China Glaze - Tree Hugger
    + Teal glitter: Sinful Colors - Nail Junkie (how appropriate!)
    + Iridescent glitter: Sinful Colors - Pearl Harbor

    Wednesday, January 19, 2011

    Nino helped with this one

    My boyfriend often laughs at/with me (but it's mostly at me) b/c I love to do my nails. He says "It's just cute that you are so dedicated to doing your nails." In truth, I love doing my nails but my life doesn't revolve around doing them (is that some sort of nail blog blasphemy or what?). So even thought I do them as often as I can, sometimes I just get lazy or feel uninspired. So lately, my nails have been half-assed b/c I don't feel like getting complicated.

    Here's a set I did while Nino was on vacation and visiting me. I asked him what color: he said "pink". I asked him what kind of design: he said "stripes. Then I said the set looked boring, so I added glitter (my own decision!) then I asked how it looked: he said "needs something... more." I let him choose the gems! and I knew I wanted stars. And in the end, the result is what you see below.


    The base pink and stripe design I've used before: Disneyland Is Cute

    polish:
    + OPI's Tutti Frutti Tonga
    + light pink striper by Art Club
    + irridescent glitter striper by Art Club
    extras:
    + Art Club nail art sprinkles in black stars
    + Swarovski flatback rhinestones (7ss Jonquil, 5ss Crysolite, 5ss Blue Zircon)

    Thursday, February 4, 2010

    Disneyland is cute


    See? Cutesy, huh?

    I went with my honey to Disneyland a bit after Christmas. Good fun! There is something completely magical about Disneyland during the holidays. *eyes sparkle* ^_^

    ♥ duration: 30 mins

    ♥ colors/steps:
    ▪ Orly Bonder
    ▪ base color: OPI's Tutti Frutti Tonga
    ▪ light pink striper by Art Club
    ▪ randomly placed irridescent glitter stripes (Art Club) in between light pink stripes.
    ▪ brighter pink/orange striper polish from Art Club used with dotting tool to make hearts.
    ▪ Orly Liquid Vinyl polish used with dotting tool to make Mickeys
    ▪ top coat: Seche Vite

    and 1 more photo:

    Sunday, September 13, 2009

    first nail posting

    Inspired by a set seen in 
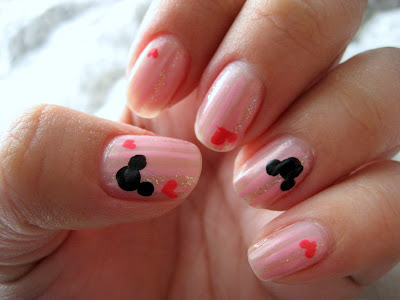
Vol. 30 Anniversary ed. of Nail Up Magazine that I picked up from my local Kinokuniya. I'm a big fan of this magazine. They're great at explaining how to do things. Generally, I find that the styles are excessively decorated (as if there's such a thing!) and when I do my version, I tend to tone down the design while attempting to maintain the cuteness of a nail set.

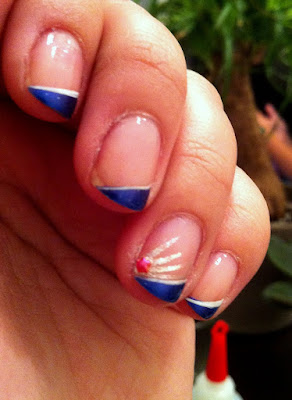
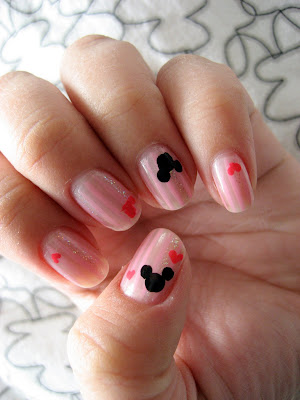
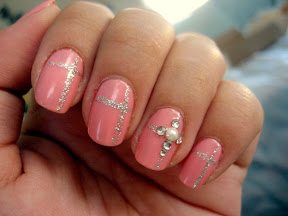
    Anyway, the article I found this set in was about "couples nails" - like the girl would have her own girly set, then the guy would have 1 nail done to match. It's actually a cute idea, I think.. but good luck finding a man that's willing to wear sparklies on his nails! (>_<)

    Here it is, my first official nail blog nail image post & description to follow:

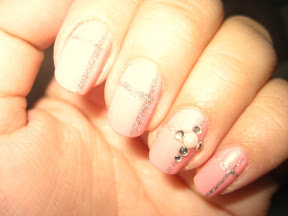
    ♥ duration:
    30 mins (including drying in between coats)

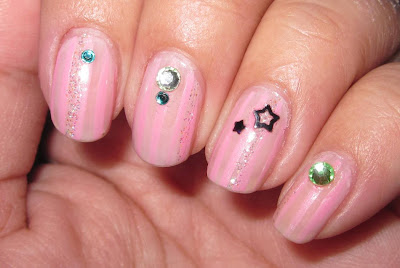
    ♥ notes about the look: sweet and elegant. the original design calls for a bright pink 7ss rhinestone in the center of the rhinestone set. I placed a pearl there instead. (because I didn't have a bright pink gem that size)

    ♥ colors/steps:
    ▪ Orly Bonder base coat
    ▪ mixed NailiteInc's Peach Shnapps, OPI's Royal Flush Blush (pearl pink), & OPI's Bride's Bouquet (creme white) all in the Peach Schnapps bottle since it was about 60% full. Applied 2 coats.
    ▪ Kiss silver striper
    10ss Swarovski hot fix pearls and 5ss/6ss crystal rhinestones from VN that my friends brought home for me.
    ▪ 2 coats of Sally Hansen Diamond Strength in Flawless (it was on sale at Walgreens) to make the glitter striper feel smooth.
    ▪ 1 final coat of Seche Vite

    Hope this is good enough for a first real post (*^▽^*) time to sleep~ nitenite!

    edit:
    @1:21am omigosh.. haha. I need to leave this thing alone! BUT~ I did get the photo slide show going and added a blog roll :D go mi ^_^~♥