
Showing posts with label nail stickers. Show all posts
Showing posts with label nail stickers. Show all posts
Wednesday, August 3, 2011


Wednesday, September 16, 2009
striped & strawberry-d
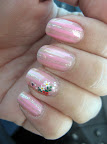
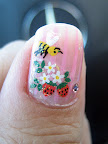
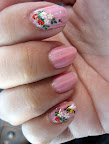
 | I really wanted to use my strawberry nail seals so I finally thought of a way (in my head) that would be pretty cute and creative-ish. I just wasn't sure how it'd turn out... and believe me, I've had those days when I was coming up with designs in my head that I just couldn't get done on my nails. they'd always turn up not quite like I imagined.. but I really like this set. (click on photos to enlarge) |
♥ duration: 45 mins (2 episodes of Nadesico)
♥ notes:
▪ Love this one. I was thinking I'd do the stripes in white but I thought it might be too much contrast.. grey pin stripes would be nice too, I think :D
▪ Parts of the nail seal curled up a bit after applying a clear coat but I touched that up by applying a teeny bit of Orly Bonder where it was lifting and pressing it down with tweezers while it was tacky. I also used nail clippers to trim the clear bits of nail seal that were flipping up (especially between the strawberries).
♥ colors/steps:

▪ 1 coat Orly Bonder
▪ 3 thin coats OPI I'll Take The Cake
▪ Applied Color Club Pastel Pink striper starting from the middle of the nail and spacing the stripes about 2mm apart until there wasn't room left on my nail.
▪ Apply Pa Nail Collective Nail Seals (strawberries & bees - peta22)
▪ 1 stripe of Art Club crystal glitter striper randomly on each nail between 2 pink stripes.
▪ Set 5ss Light Rose Swarovski Rhinestone on my nail using Orly Bonder as an adhesive.
▪ Fixed lifting corners with Orly Bonder and nail clippers to trim excessive parts.
▪ 2 final coats of Seche Vite
Sunday, September 13, 2009
black lace wedding nails
 Since I saw Josh and Maris today (for some decoden fun!) I decided I'm going to be a rebel and post WAY out of order. These are the nails I did for their wedding which I attended on a TUESDAY down in the OC (June 30, 2009). haha~ It was going to be a fun wedding, so I wanted to make fun nails. But of course they'd have to be sophisticated since it was a wedding n all ^_^ I wasn't sure if black would be scary for the wedding.. but I went with it anyway and I thought it actually turned out great. I'm not a fan of ALL black just yet, but I'm okay with the tips ^_^ I like OPI's I Only Drink Champagne b/c it's a really soft but pretty pearly shade of cream. It's one of my more.. neutral and "mature" colors. lol.


♥ duration: 45 mins (15 mins for touch up the night before the wedding)
♥ notes:
▪ I cut the lace in half the long way (which I purchased from Orange Lighthouse). That's just the bottom half with the draped part.
▪ Dark colors are difficult with tips b/c the tips of your nails are the first to chip so it looks really obvious when a black part chips off. -_-
▪ Also, dunno if you'll notice that my index fingers might have some orange-y stains in the detailed pictures.. I went to a crawdad place for dinner the night I arrived in Irvine with friends I stayed with.. as a result, my skin was a tad bit stained. >.<
▪ This set matched the ring my dragi gave me. (*´▽`*)
♥ colors/steps:

▪ Orly Bonder base coat
▪ 2 coats of OPI's I Only Drink Champagne
▪ Orly's Liquid Vinyl for the tips
▪ Measured (roughly), applied, & trimmed PA Collective Nail Stickers in black lace. I trimmed the lace with nail clippers b/c i can get closer to the edge of my nails than with scissors.
▪ Applied a thin layer of Orly Bonder as a tacky glue for the gems following the line of lace.
▪ Set a row of 5ss Crystal AB Swarovski rhinestones on each of my ring fingers after applying Orly Bonder
▪ 1 coat of Orly's Won't Chip (before I had Seche Vite... also a note about Orly's Won't Chip.. it makes lots of bubbles when being applied-esp around anything raised like gems and stickers so I stopped using it).
Hoorah~ 2nd post down.. 30 something more to go. lol. ( ̄□ ̄;)
Subscribe to:
Posts (Atom)